






By Jim Shimabukuro (assisted by ChatGPT)
Editor
Manual focusing with the f/0.95 lens on the X-T2, X-T4, and X-E1: The 7artisans 35mm f/0.95 can produce a sharply focused subject against a strongly blurred background, but it asks you to do the focusing. On the Fujifilm X-T2, the most dependable starting method is to enable shooting with an unrecognized lens, select manual focus, turn on focus peaking, and use magnification to check the detail that matters. This guide takes you through those operations and explains the changes needed for the X-T4 and X-E1. Btw, part of the motivation for this article is the desire to test OpenAI’s GPT-6 “Intelligent UI” (user interface) released yesterday, October 7, 2026.

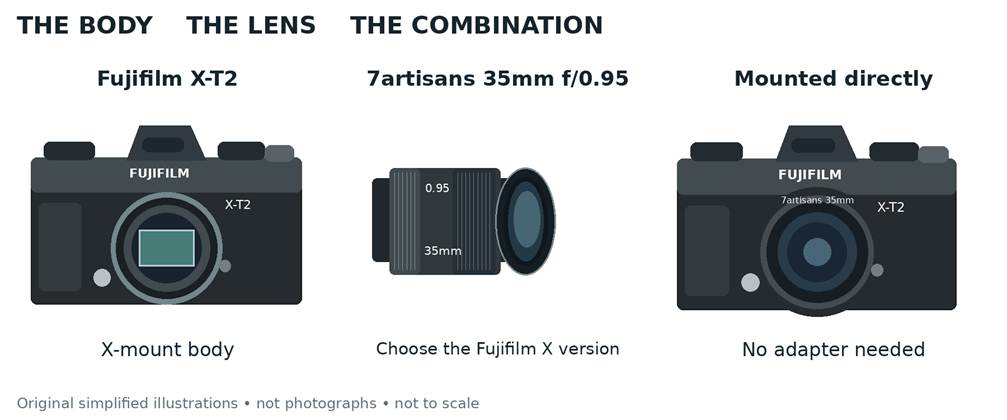
Figure 1. The X-T2 body, the lens, and the mounted combination. Original simplified drawings based on Fujifilm’s parts diagrams and published lens views; not to scale (Fujifilm, n.d.-h; Rask, 2020).
Check the mount first. This article concerns the manual-focus APS-C still-photography lens marked 35mm 1:0.95, in its Fujifilm X-mount version. The same lens name appears on versions for other mounts. The X version attaches directly to all three bodies; a Sony E or other version does not. Do not confuse this lens with a 7artisans cine lens, a different 35mm model, or a TTArtisan product (7artisans, n.d.; Byskov, 2021).
The 35mm focal length gives approximately the field of view of a 52.5mm lens on a full-frame camera. It remains a 35mm f/0.95 lens for exposure and for the focal-length setting described below. The minimum focusing distance is 0.37m, measured from the camera’s sensor plane, so this is a close-detail lens rather than a macro lens (7artisans, n.d.).
Prepare your camera
1 Attach the lens with the camera switched off
Remove the body cap and rear lens cap in a clean area. Match the mounting mark on the lens to the mark on the camera, insert the lens squarely, and rotate it until it clicks into place. Do not press the lens-release button while attaching it. To remove it later, switch the camera off, hold the release button, and turn the lens in the opposite direction. Keep fingers away from the exposed sensor (Fujifilm, n.d.-a).
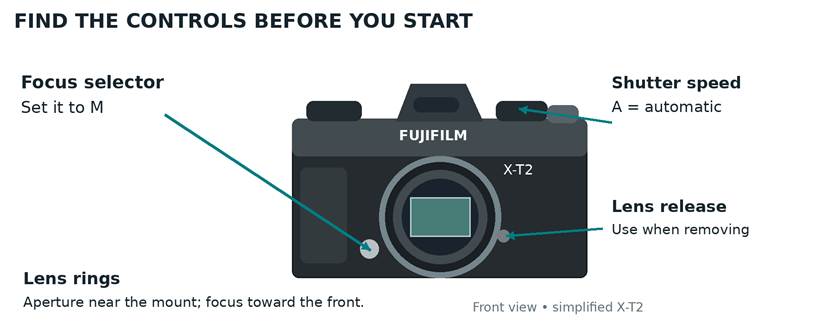
Figure 2. Essential X-T2 controls shown from the front. The focus selector sits low beside the mount; the shutter-speed dial is on top. Control locations follow Fujifilm’s parts diagram (Fujifilm, n.d.-h).
2 Allow the camera to release the shutter
Press MENU/OK. Move left to the menu tabs if necessary, choose SET UP, identified by the wrench icon, then open BUTTON/DIAL SETTING. Scroll to SHOOT WITHOUT LENS, select ON, and confirm with MENU/OK. Press DISP/BACK to leave the menu. The lens has no electronic contacts, so the camera needs this permission even though a lens is physically attached (Fujifilm, n.d.-i; Byskov, 2021).
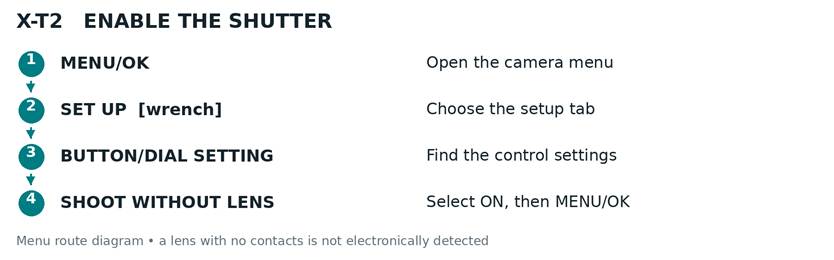
Figure 3. Follow this menu route once to enable shutter release. These are instructional labels, not a camera screenshot (Fujifilm, n.d.-i).
3 Select manual focus and a clear view
Rotate the small front focus selector to M. This is the focus setting; it is separate from manual exposure. Look through the electronic viewfinder and adjust the diopter wheel until the displayed lettering looks sharp. Start with the drive dial on S, meaning one photograph per press (Fujifilm, n.d.-h, n.d.-f).
Turn on focus peaking
4 Choose a visible highlight color and level
From the shooting display, press MENU/OK, choose AF/MF SETTING, and open MF ASSIST. Select FOCUS PEAK HIGHLIGHT. Choose RED (LOW) as an initial setting, confirm with MENU/OK, and return to shooting with DISP/BACK. On the X-T2, white, red, and blue are available with high or low intensity. Choose a color that contrasts with your subject (Fujifilm, n.d.-k, n.d.-e).
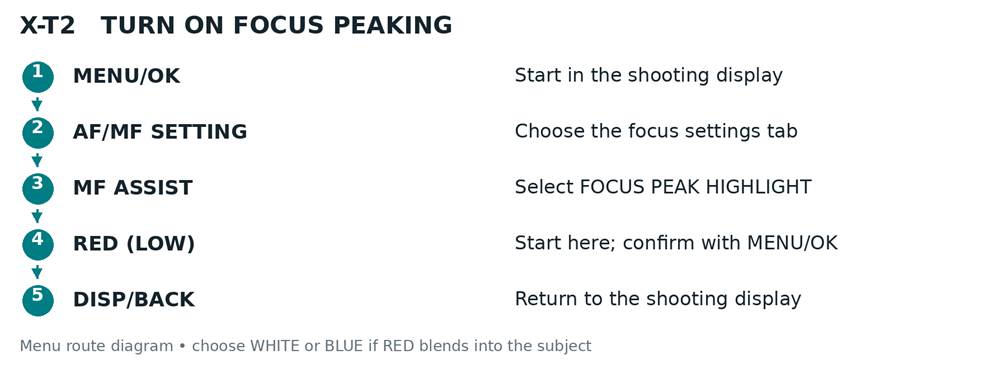
Figure 4. The X-T2 focus-peaking route. RED (LOW) is a practical starting choice, not a required setting. White or blue may be easier to see against red subjects (Fujifilm, n.d.-k, n.d.-e).
Fujifilm describes peaking as follows: “The camera heightens high-contrast outlines” (Fujifilm, n.d.-k, “MF ASSIST” section). As you turn the lens’s focus ring, highlighted edges appear on the parts of the image that have sufficient contrast. Watch the feature you actually want sharp: the nearer eye in a portrait, lettering on an object, or the edge of a flower petal.
Use LOW when the highlighted edges are already clear. If they are hard to see, try HIGH or another color. HIGH makes the aid more conspicuous, but a large amount of highlighting can make the exact focus position harder to judge. Treat peaking as a guide and confirm important focus with an enlarged view. These are working recommendations, rather than a claim that one setting is optimal for every subject.
A blank wall offers little detail for peaking to highlight. Begin with a printed card or a textured object in good light. Peaking is visible in the electronic viewfinder and LCD during focusing; the colored outline is a display aid and is not written into the photograph (Fujifilm, n.d.-f, n.d.-e).
Magnify the detail that matters
5 Set up the rear dial and focus by hand

Figure 5. X-T2 rear controls. Pressing the rear command dial invokes its assigned function. Assign FOCUS CHECK if the camera has been customized to do something else (Fujifilm, n.d.-i, n.d.-h).
Place the focus frame over your subject using the focus stick. Press the center of the rear command dial to enlarge that area; turn the dial to change magnification. If a press does not enlarge the view, go to SET UP → BUTTON/DIAL SETTING → Fn/AE-L/AF-L BUTTON SETTING. Select the rear command dial in the control diagram and assign FOCUS CHECK. Return to shooting and try again (Fujifilm, n.d.-i, n.d.-h).
Rotate the lens’s front focus ring slowly while looking at the enlarged detail. Pass slightly beyond the sharpest position, then return to it. Judge the actual detail as well as the colored outline. Press the rear dial again to leave the enlarged view, check the composition, and make the exposure (Fujifilm, n.d.-h, n.d.-f).
The similarly named AF/MF SETTING → FOCUS CHECK → ON controls automatic magnification when a communicating lens’s focus ring is turned. This 7artisans lens cannot report ring movement. Use the button-operated magnification above. Turning the camera’s command dial will not focus the lens, and AF-L or eye-detection autofocus cannot drive its mechanical focusing ring. The missing electronic connection also prevents a dependable camera-generated focus-distance or depth-of-field scale (Byskov, 2021; Fujifilm, n.d.-f).
The camera’s FOCUS RING direction preference concerns electronically controlled lenses. It cannot reverse the mechanical action of the 7artisans ring. Watch the distance markings on the lens and the image itself when learning which direction brings nearer or farther subjects into focus.
Set exposure and choose an aperture
6 Begin with aperture priority
Unlock the X-T2 shutter-speed dial if necessary and turn it to A. Select f/2.8 on the lens’s aperture ring, located nearer the mount. Set ISO to 400 for a first daylight practice session, or use Auto ISO as described below. Set the exposure-compensation dial to 0. The camera meters the light coming through the lens and chooses a shutter speed; you choose the aperture. Confirm A in the display (Fujifilm, n.d.-g).
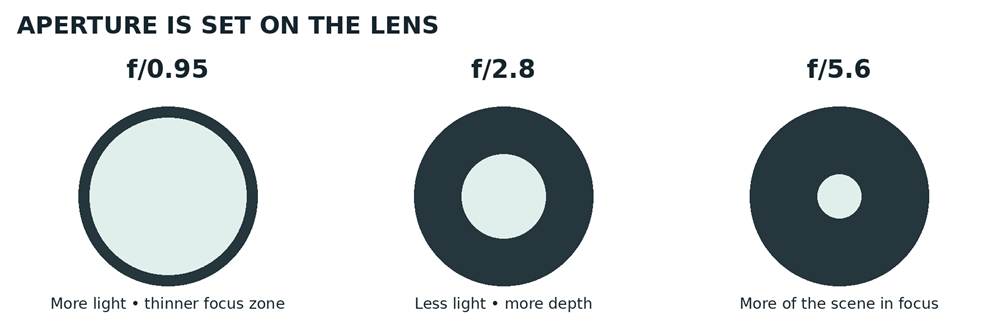
Figure 6. A smaller f-number means a wider opening. The circles illustrate aperture size and the general depth-of-field tradeoff, not measured image quality or the lens’s exact iris geometry.
The camera may show F0 or another unavailable-aperture indication. That is expected: it cannot read the lens’s aperture setting. Check the engraved scale on the lens. Its aperture ring has no clicks and can be nudged accidentally. Aperture and lens identification are not transmitted automatically; shutter speed, ISO, and other camera data can still be recorded (Byskov, 2021).
For a useful X-T2 Auto ISO starting point, open SHOOTING SETTING → ISO AUTO SETTING → AUTO1. Choose DEFAULT SENSITIVITY 200, MAX. SENSITIVITY 6400, and MIN. SHUTTER SPEED 1/125 SEC. Put the top ISO dial on A; if A has been customized, set SET UP → BUTTON/DIAL SETTING → ISO DIAL SETTING (A) to AUTO. These values are suggested practice settings. Check the actual shutter speed, since it can fall below the selected minimum when light is insufficient at the ISO ceiling (Fujifilm, n.d.-i, n.d.-l).
For a seated person, try 1/250 second or faster as a starting point. Moving subjects may need substantially faster speeds. You can select 1/250 on the shutter dial, choose the aperture on the lens, and use Auto ISO: the camera is then in manual exposure with automatic sensitivity. With fixed ISO instead, adjust exposure yourself using the meter. Manual focusing works in either exposure mode (Fujifilm, n.d.-g).
In manual exposure without flash, enable SET UP → SCREEN SET-UP → PREVIEW EXP./WB IN MANUAL MODE → PREVIEW EXP./WB. For flash work, OFF may make framing easier. In bright sunlight, f/0.95 may overexpose even at a fast mechanical shutter speed; stop down or use an appropriate neutral-density filter. Electronic shutter offers faster speeds, but moving subjects can distort and artificial lighting can produce bands (Fujifilm, n.d.-l, n.d.-j).
Practice before opening all the way
7 Practice before using the widest aperture
Put a printed card on a table with another object farther behind it. At f/2.8, move the focus frame onto the card, magnify, and turn the focus ring until its letters are crisp. Take a photograph. Repeat at f/1.4 and f/0.95, refocusing at each aperture. Compare the sharp lettering and the background blur. This exercise separates a focus error from the softer rendering a lens may produce wide open.
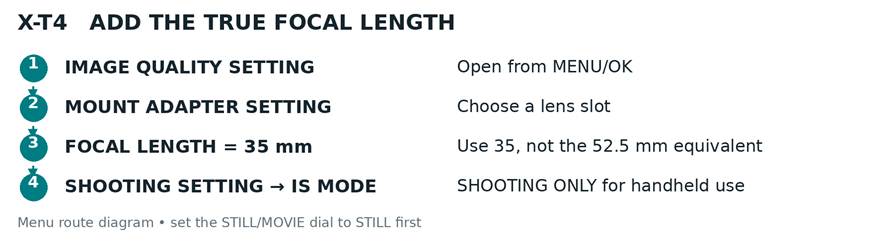
Figure 7. A practice subject before and after focusing. The red lines simulate peaking. The illustration demonstrates the focusing aid; it is not an optical test or a sample image from the lens.
At f/0.95, keep the camera-to-subject distance steady after focusing. For portraits, enlarge the nearer eye and check the eyelashes rather than a spectacle frame. Avoid a large focus-and-recompose movement; put the enlarged area where the eye sits in the final composition. If the subject shifts, refocus. Stop down when you need both eyes or several people sharp.
The depth-of-field margin is small at close distances. As an illustrative calculation, a 35mm lens at f/0.95 focused at 1m has about 3cm of conventional depth of field, using a 0.02mm circle of confusion for APS-C. At 2m it is about 12cm. These are approximate optical calculations, not camera readouts or guarantees of pixel-level sharpness; viewing size and the focus standard change what looks acceptably sharp.
8 Inspect the recorded photograph
Press the playback button. Enlarge the image with the rear command dial and inspect the detail you focused on. If the card behind your subject is sharper, you focused too far away. If all edges streak in one direction, investigate movement and shutter speed. Repeat the exercise on a supported camera before concluding that the lens itself is defective (Fujifilm, n.d.-h, n.d.-m).
What the lens does well and where it struggles
This lens is most appealing when you want selective focus and can take time to place it. The wide aperture can isolate a stationary person or object; the metal barrel and smooth mechanical ring make the process direct. Rask (2020) wrote, “The focus ring is very smooth” (“Build and feel” section), and reported useful wide-open sharpness and strong background separation in his photographs. His experience is a useful account of handling and rendering, rather than a promise that every photograph or lens copy will look the same.
A more recent test is stricter. Peter Roskothen’s review was originally published June 28, 2025, and displays an October 3, 2026 update. It describes center sharpness as modest at f/0.95, improving at f/1.4 and strongest around f/5.6; edge sharpness improves later. He also reports color fringing and a marked sensitivity to light entering from the front or side. His phrase “anfällig für Gegenlicht und Streiflicht” translates as “susceptible to backlighting and oblique light” (Roskothen, 2026, “Gegenlicht und Streiflicht” section; translation by the author).
Those findings suggest practical choices. Use f/0.95 when background separation is worth a thinner focus margin and softer corners. Try f/1.4–f/2.8 when a person’s face needs more depth. Use f/5.6–f/8 for a static scene that needs detail across the frame. Inspect bright edges for purple or green fringes. Change your position or shade the lens when flare reduces contrast. A suitable hood can help with stray light, although it cannot eliminate every flare or aberration (Roskothen, 2026).
The lens’s nominal light-gathering advantage over f/1.4 is about 1.12 stops, or 2.17 times the light, calculated from the f-numbers. Actual transmission and metering can reduce the practical difference. Byskov (2021) found similar metered shutter speeds in his informal comparison with the Fujifilm XF35mmF1.4. That small comparison does not establish a laboratory transmission rating. Test your own combination before assuming that f/0.95 always buys an extra stop of shutter speed.
For planned portraits, tabletop objects, quiet indoor scenes, and flowers protected from wind, the lens gives you time to focus and use the blur deliberately. Street photography becomes easier if you anticipate a subject’s position, stop down, and prefocus. Sports, active children, and rapidly changing events demand more timing and produce more missed focus. For work where you must repeatedly capture moving eyes sharply, an autofocus lens is usually the more practical choice. These use recommendations follow the lens’s mechanical focusing and the reported test results (Rask, 2020; Byskov, 2021).
The clickless aperture ring can also suit controlled video exposure changes, but it can move unintentionally during still photography. Keep a finger on the focus ring rather than gripping both rings together. There is no optical stabilization in this lens, and the X-T2 and X-E1 lack in-body stabilization. Avoid relying on a weather-resistant body to protect an unsealed lens in rain (Rask, 2020; Roskothen, 2026; Fujifilm, n.d.-l, n.d.-c).
A useful first assessment of your own copy is a stationary, evenly lit subject photographed at several apertures, with deliberate refocusing for each shot. Check center detail, edges, color fringes, and contrast separately. A single handheld f/0.95 image mixes optical performance with focusing and movement; it is a poor basis for judging the lens.
Use the lens on two other Fujifilm bodies
The lens’s physical operation is the same on all three bodies. Turn its own ring to focus and its own aperture ring to set the opening. All require SHOOT WITHOUT LENS → ON. The menu organization and available focusing aids differ, and the X-T4 adds in-body stabilization (Fujifilm, n.d.-c, n.d.-d, n.d.-b).
| Feature | X-T2 | X-T4 | X-E1 |
| Direct X-mount attachment | Yes | Yes | Yes |
| Shoot without lens | SET UP → BUTTON/DIAL SETTING | SET UP → BUTTON/DIAL SETTING | SHOOTING MENU |
| Peaking menu | AF/MF SETTING → MF ASSIST | AF/MF SETTING → MF ASSIST | SHOOTING MENU → MF ASSIST |
| Peaking choices | White, red, blue; high/low | White, red, blue, yellow; high/low | White; high/low; firmware 2.00+ |
| Button magnification | Rear command dial; assign FOCUS CHECK | Rear command dial; assign FOCUS CHECK | Press command dial; turn for 3× / 10× |
| Stabilization with this lens | None | In-body stabilization; enter 35mm | None |
Table 1. Body differences verified against Fujifilm’s manuals, focusing guide, and X-E1 firmware notes (Fujifilm, n.d.-i, n.d.-c, n.d.-d, n.d.-b, n.d.-e).
For the newer body
Set the STILL/MOVIE dial to STILL. Enable SHOOT WITHOUT LENS in SET UP → BUTTON/DIAL SETTING, set the front focus selector to M, and choose AF/MF SETTING → MF ASSIST → FOCUS PEAK HIGHLIGHT. Select a color and level. Use the rear command dial to magnify; assign FOCUS CHECK in BUTTON/DIAL SETTING → FUNCTION (Fn) SETTING if needed. Automatic focus or automatic magnification from ring movement remains unavailable with this lens (Fujifilm, n.d.-d).
Figure 8. X-T4 focal-length entry and stabilization. The manual places MOUNT ADAPTER SETTING in IMAGE QUALITY SETTING. Its name does not mean this native X-mount lens needs an adapter (Fujifilm, n.d.-d).
Enter 35mm as the true focal length for stabilization, not 52.5mm. Select SHOOTING SETTING → IS MODE → SHOOTING ONLY for handheld stills as a starting choice; select OFF when the camera is fixed on a tripod. Stabilization reduces camera shake. It cannot stop a person moving or repair missed focus (Fujifilm, n.d.-d).
Set up the older body
The X-E1’s original manual predates focus peaking. Fujifilm added it in firmware 2.00. With the camera switched off, hold DISP/BACK while switching on to check the firmware version. If an update is needed, follow Fujifilm’s current download instructions with a fully charged battery. The support page lists version 2.71; the peaking prerequisite is 2.00 or later (Fujifilm, n.d.-b).

Figure 9. X-E1 uses the SHOOTING MENU rather than the X-T2 AF/MF and setup paths. Firmware 2.00 added peaking and 3×/10× magnification switching (Fujifilm, n.d.-c, n.d.-b).
Set the front focus selector to M. In SHOOTING MENU, set SHOOT WITHOUT LENS to ON. Then choose MF ASSIST → FOCUS PEAK HIGHLIGHT → LOW or HIGH. Peaking is white; do not look for the X-T2’s red or blue options. Press the command dial to magnify and turn it to switch between 3× and 10×. Press again to return to the full view. Holding the dial switches between peaking and STANDARD (Fujifilm, n.d.-c, n.d.-b).
The X-E1 has no focus stick. Use the focus-area selection control and selector buttons described in its manual; with later firmware, the down-selector function can be assigned to focus-frame selection. Aperture priority works by putting the shutter-speed dial on A and selecting aperture on the lens. ISO is chosen through the camera’s menus or assigned function control rather than an X-T2-style top ISO dial (Fujifilm, n.d.-c, n.d.-b).
For an expert who prefers an unobstructed view, STANDARD plus magnification is a valid alternative on all three bodies. For static tripod work, focus directly at the taking aperture and inspect the enlarged image. For broader depth in daylight, practice prefocusing at f/5.6 or f/8. Treat engraved distance and depth-of-field markings as estimates and check photographs at your intended output size.
Solve the common problems
| What you see | What to check or change |
| The shutter will not release | Enable SHOOT WITHOUT LENS. Also check the battery, card, and any displayed warning. |
| No colored focus edges | Set the front selector to M and MF ASSIST to FOCUS PEAK HIGHLIGHT. Aim at textured detail; try another color or HIGH. |
| The ring turns but the view does not enlarge | Expected with this lens. Press the rear command dial assigned to FOCUS CHECK; on X-E1, press the command dial. |
| Magnification button performs another action | Reassign the X-T2 or X-T4 rear dial to FOCUS CHECK. Leave the menus before testing it. |
| F0 appears or the aperture is missing | Expected without electronic contacts. Read the aperture scale on the lens. |
| The eye is soft despite peaking | Magnify the eye, refocus, steady the distance, and check shutter speed. Stop down if more depth is needed. |
| Most of the scene highlights at once | Try LOW or STANDARD with magnification. Confirm actual detail rather than the quantity of colored outlines. |
| Contrast washes out near a bright light | Change your angle or shade the lens without covering its view. Inspect for flare and colored fringes. |
| IS MODE is unavailable on X-T2 | Expected with this unstabilized lens. X-T2 has no in-body stabilization. |
| X-E1 has no MF ASSIST peaking choice | Check firmware. Peaking was introduced in version 2.00. |
Table 2. Troubleshooting combines the verified camera operations with practical focusing recommendations (Byskov, 2021; Roskothen, 2026; Fujifilm, n.d.-i, n.d.-k, n.d.-h, n.d.-l, n.d.-d, n.d.-b).
For the next session, start with a still subject at f/2.8. Confirm that the shutter works, peaking is visible, and button magnification works. Then open to f/0.95 and repeat. When the enlarged detail and the recorded photograph agree, you have a working method you can carry into portraits and low-light photography.
References
Source note. Fujifilm’s manuals and firmware histories are the controlling sources for these older camera bodies. Undated online manuals are cited as n.d.; their retrieval date is October 8, 2026. The recent lens test is prioritized for image-quality discussion, with earlier first-person tests retained for handling and comparison. All illustrations in this guide are original explanatory drawings, not measured optical tests or camera screenshots.
7artisans. (n.d.). 35mm F0.95 [Product page]. Retrieved October 8, 2026, from https://www.7artisans.com/prod_view.aspx?id=388&nid=3&typeid=102
Byskov, M. (2021, May 11). 7Artisans 35mm f/0.95 review. 5050 Travelog. https://www.5050travelog.com/camera-and-lens-reviews/7artisans-35mm-f-095-review
Fujifilm. (n.d.-a). Attaching a lens. FUJIFILM X-T2 owner’s manual version 4.10. Retrieved October 8, 2026, from https://fujifilm-dsc.com/en/manual/x-t2_v41/first_step/attach_lens/index.html
Fujifilm. (n.d.-b). FUJIFILM X-E1 firmware update [Version history including 2.00]. Retrieved October 8, 2026, from https://www.fujifilm-x.com/en-us/support/download/firmware/cameras/x-e1/
Fujifilm. (n.d.-c). FUJIFILM X-E1 owner’s manual. https://dl.fujifilm-x.com/support/manual/x/fujifilm_xe1_manual_en.pdf
Fujifilm. (n.d.-d). FUJIFILM X-T4 owner’s manual [Online manual; see Manual focus, AF/MF setting, Button/dial setting, Image quality setting, and Shooting setting]. Retrieved October 8, 2026, from https://fujifilm-dsc.com/en/manual/x-t4/
Fujifilm. (n.d.-e). How your X Series camera can help with manual focusing. Retrieved October 8, 2026, from https://www.fujifilm-x.com/en-us/stories/intermediate-month-5-focusing-20-manual-focusing-aids/
Fujifilm. (n.d.-f). Manual focus. FUJIFILM X-T2 owner’s manual version 4.10. Retrieved October 8, 2026, from https://fujifilm-dsc.com/en/manual/x-t2_v41/taking_photo/manual-focus/index.html
Fujifilm. (n.d.-g). P S A and M modes. FUJIFILM X-T2 owner’s manual version 4.10. Retrieved October 8, 2026, from https://fujifilm-dsc.com/en/manual/x-t2_v41/taking_photo/shooting_mode/index.html
References continued
Fujifilm. (n.d.-h). Parts of the camera. FUJIFILM X-T2 owner’s manual version 4.10. Retrieved October 8, 2026, from https://fujifilm-dsc.com/en/manual/x-t2_v41/about_this_camera/parts/index.html
Fujifilm. (n.d.-i). The setup menus button dial setting. FUJIFILM X-T2 owner’s manual version 4.10. Retrieved October 8, 2026, from https://fujifilm-dsc.com/en/manual/x-t2_v41/menu_setup/button-dial_setting/index.html
Fujifilm. (n.d.-j). The setup menus screen setting. FUJIFILM X-T2 owner’s manual version 4.10. Retrieved October 8, 2026, from https://fujifilm-dsc.com/en/manual/x-t2_v41/menu_setup/screen_set-up/index.html
Fujifilm. (n.d.-k). The shooting menus AF MF setting. FUJIFILM X-T2 owner’s manual version 4.10. Retrieved October 8, 2026, from https://fujifilm-dsc.com/en/manual/x-t2_v41/menu_shooting/af_mf_setting/index.html
Fujifilm. (n.d.-l). The shooting menus shooting setting. FUJIFILM X-T2 owner’s manual version 4.10. Retrieved October 8, 2026, from https://app.fujifilm-dsc.com/en/manual/x-t2_v41/menu_shooting/shooting_setting/index.html
Fujifilm. (n.d.-m). Viewing pictures. FUJIFILM X-T2 owner’s manual version 4.10. Retrieved October 8, 2026, from https://fujifilm-dsc.com/en/manual/x-t2_v41/basic_photo/photo_view/index.html
Rask, J. (2020, November 15). The 7artisans 35mm f0.95 review. Jonas Rask Photography. https://jonasraskphotography.com/2020/11/15/the-7artisans-35mm-f0-95-review/
Roskothen, P. (2026, October 3). 7Artisans 35 mm f/0,95 Objektiv Test Bokeh Review und Bildqualität [Lens test; originally published June 28, 2025]. Fotowissen. https://www.fotowissen.eu/objektiv-test-7artisans-35mm-f0-95/
###
Filed under: Uncategorized |






























































































































































































































































































































































































































































































Leave a Reply